
Slurmとは
Slurmは,複数のプログラムやタスク(ジョブ)の実行や停止,監視を行うためのソフトウェアであり,いわゆる「ジョブスケジューラ」です.
オープンソースソフトウェアということもあり,多くのスパコンでもSlurmが採用されています.
正式名称はSlurm Workload Managerであり,旧称はSimple Linux Utility Resource Management(SLURM)になります.
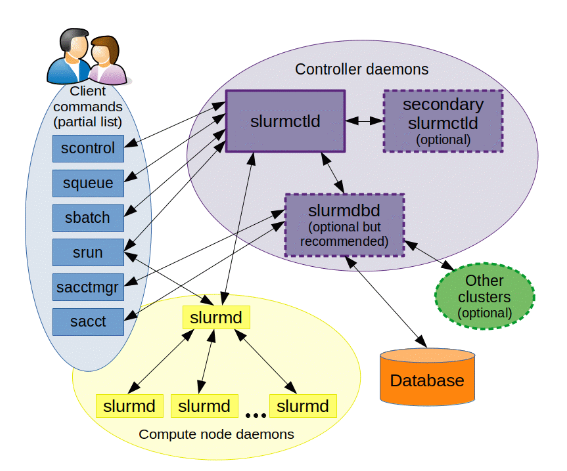
Slurmを構成する重要なモジュールは,slurmctld, slurmd, slurmdbdです.
slurmcltdとは
slurmctld(The central management daemon of Slurm)は,Slurmの管理用デーモンです.後述するSlurmデーモンとリソースの監視を担います.
slurmctldは管理ノードに配置されます.
slurmdbd
slurmdbdはSlurm Database Deamonであり,ジョブに関する履歴を保存する役割を担います.
管理ノードの配置しますが,Slurmにおいて必須機能ではありません.
slurmdとは
slurmd(The compute node daemon for Slurm)は,計算ノードにおけるジョブの実行管理や監視を担います.
クラスタを構成するすべてのノードに配置します.
前提条件
Slurmを導入するクラスタにおいて,時刻,ユーザとグループ(UIDとGID)が同期されている必要があります.
時刻同期に関しては,クラスタ内でNTPサーバ機能を持たせることで解決できます.
UIDとGIDに関しては,下記の方法があります.
- 手動ですべてのノードでUID,GIDが同じユーザおよびグループを作成する(ノードが少ない場合はこれで十分)
- LDAPサーバを構築する(ノードが多い場合におすすめ)

LDAPサーバ導入に関してはは,下記記事に記載しています.
>> スーパーユーザーなら知っておくべきLinuxシステムの仕組み

インストールと設定
ログインノード
ログインノードは,計算を行わずジョブ投入が目的です.
ログインノード用のPartitionを作成し,StateをDownにする(計算させない)ことを推奨します.
/etc/slurm/slurm.conf
...
NodeName=login NodeAddr=***.***.***.*** CPUs=2 State=DOWN
PartitionName=login Nodes=login State=DOWN
管理ノード
管理ノードに必要な機能は,
- slurmctl
- slurmd
- slurmdb
下記コマンドで,認証に使用されるMUNGEとSLURMのパッケージがインストールされます.slurmctlとslurmdはこのパッケージに含まれています.
apt install slurm-wlm
下記コマンドで,バージョンを確認できます.
munge --version
munge-0.5.14 (2020-01-14)
slurmd --version
slurm-wlm 21.08.5
slurmctld -V
slurm-wlm 21.08.5
slurmdbdの設定
データベースとして,MySQLまたはMariaDBを使用することが推奨されています.
ここでは,ライセンス制約の緩いMariaDBを使用します.
・MariaDBのインストール
apt install mariadb-server
mysql_secure_installation

NOTE: RUNNING ALL PARTS OF THIS SCRIPT IS RECOMMENDED FOR ALL MariaDB
      SERVERS IN PRODUCTION USE!  PLEASE READ EACH STEP CAREFULLY!

In order to log into MariaDB to secure it, we'll need the current
password for the root user. If you've just installed MariaDB, and
haven't set the root password yet, you should just press enter here.

Enter current password for root (enter for none):
OK, successfully used password, moving on...

Setting the root password or using the unix_socket ensures that nobody
can log into the MariaDB root user without the proper authorisation.

You already have your root account protected, so you can safely answer 'n'.

Switch to unix_socket authentication [Y/n] n
 ... skipping.

You already have your root account protected, so you can safely answer 'n'.

Change the root password? [Y/n] n
 ... skipping.

By default, a MariaDB installation has an anonymous user, allowing anyone
to log into MariaDB without having to have a user account created for
them.  This is intended only for testing, and to make the installation
go a bit smoother.  You should remove them before moving into a
production environment.

Remove anonymous users? [Y/n] y
 ... Success!

Normally, root should only be allowed to connect from 'localhost'.  This
ensures that someone cannot guess at the root password from the network.

Disallow root login remotely? [Y/n] y
 ... Success!

By default, MariaDB comes with a database named 'test' that anyone can
access.  This is also intended only for testing, and should be removed
before moving into a production environment.

Remove test database and access to it? [Y/n] y
 - Dropping test database...
 ... Success!
 - Removing privileges on test database...
 ... Success!

Reloading the privilege tables will ensure that all changes made so far
will take effect immediately.

Reload privilege tables now? [Y/n] y
 ... Success!

Cleaning up...

All done!  If you've completed all of the above steps, your MariaDB
installation should now be secure.

Thanks for using MariaDB!
念のため,設定したパスワードでログインできることを確認します.
mariadb -u root -p
Enter password:
ログインが確認できれば,DBの設定は完了です.
slurmdbdのインストール
apt install slurmdbd
slurmユーザがDBにアクセスできるように設定します.
create slurm identified by 'passwd';
GRANT ALL PRIVILEGES ON slurm_acct_db.* TO slurm;
FLUSH PRIVILEGES;
・slurmdb.conf
まず,下記のようにデータベースのパラメータをSlurm推奨値に変更します.
/etc/mysql/my.cnf
...
[mysqld]
innodb_buffer_pool_size = 4096M
innodb_log_file_size = 128M
innodb_lock_wait_timeout = 900
...
ファイル編集後にその設定をデータベースに反映させます.
systemctl restart mariadb.service
下記のように,変数が変更されていることが確認できます.
MariaDB [(none)]> show variables like 'innodb_buffer_pool_size';
+-------------------------+------------+
| Variable_name           | Value      |
+-------------------------+------------+
| innodb_buffer_pool_size | 4294967296 |
+-------------------------+------------+
1 row in set (0.001 sec)

MariaDB [(none)]> show variables like 'innodb_log_file_size';
+----------------------+----------+
| Variable_name        | Value    |
+----------------------+----------+
| innodb_log_file_size | 67108864 |
+----------------------+----------+
1 row in set (0.001 sec)

MariaDB [(none)]> show variables like 'innodb_lock_wait_timeout';
+--------------------------+-------+
| Variable_name            | Value |
+--------------------------+-------+
| innodb_lock_wait_timeout | 900   |
+--------------------------+-------+
1 row in set (0.001 sec)
続いて,slurmdbdの設定ファイルを作成します.
/etc/slurm/slurmdbd.conf
ArchiveEvents=yes
ArchiveJobs=yes
ArchiveResvs=yes
ArchiveSteps=no
ArchiveSuspend=no
ArchiveTXN=no
ArchiveUsage=yes
#ArchiveScript=/usr/sbin/slurm.dbd.archive
AuthInfo=/var/run/munge/munge.socket.2
AuthType=auth/munge
DebugLevel=info
PurgeEventAfter=1month
PurgeJobAfter=12month
PurgeResvAfter=1month
PurgeStepAfter=1month
PurgeSuspendAfter=1month
PurgeTXNAfter=12month
PurgeUsageAfter=24month
LogFile=/var/log/slurmdbd.log
PidFile=/var/run/slurmdbd.pid
SlurmUser=slurm
DbdHost=head
StorageType=accounting_storage/mysql
StorageUser=root
StoragePass=password
ファイルの所有者をslurmに変更します.
chmod slurm: /etc/slurm/slurmdbd.conf
設定を反映するため,サービスを再起動します.
systemctl restart slurmctld.service slurmd.service slurmdbd.service
slurm.confの設定
slurm.confはSlurmの設定ファイルです.下記のような設定ファイルを作成します.
/etc/slurm/slurm.conf
ClusterName=cluster
SlurmctldHost=head
#
#MailProg=/bin/mail
MpiDefault=none
#MpiParams=ports=#-#
ProctrackType=proctrack/linuxproc
ReturnToService=1
SlurmctldPidFile=/run/slurmctld.pid
#SlurmctldPort=6817
SlurmdPidFile=/run/slurmd.pid
#SlurmdPort=6818
SlurmdSpoolDir=/var/lib/slurm/slurmd
SlurmUser=slurm
#SlurmdUser=root
StateSaveLocation=/var/lib/slurm/slurmctld
SwitchType=switch/none
TaskPlugin=task/affinity
#
#
# TIMERS
#KillWait=30
#MinJobAge=300
#SlurmctldTimeout=120
#SlurmdTimeout=300
#
#
# SCHEDULING
SchedulerType=sched/backfill
SelectType=select/cons_tres
SelectTypeParameters=CR_Core
#
#
# LOGGING AND ACCOUNTING
AccountingStorageType=accounting_storage/slurmdbd
#JobAcctGatherFrequency=30
JobAcctGatherType=jobacct_gather/linux
#SlurmctldDebug=info
SlurmctldLogFile=/var/log/slurmctld.log
#SlurmdDebug=info
SlurmdLogFile=/var/log/slurmd.log
#
#
# COMPUTE NODES
NodeName=head NodeAddr=192.168.80.147 CPUs=4 State=UNKNOWN
NodeName=comput-01 NodeAddr=192.168.80.148 CPUs=4 State=UNKNOWN
PartitionName=ALL Nodes=ALL Default=YES MaxTime=INFINITE State=UP
利用可能なパラメータは膨大ですが,下記公式サイトに各種パラメータの説明が記載されています.
https://slurm.schedmd.com/slurm.conf.html
slurm.confをクラスタの各ノードに配置する必要があります.
ただ,ファイルをコピーするのが面倒なため,コピーする代わりに次に記述するConfigless Slurmを使用します.
Configless Slurm
Configlessは,計算ノード(slurmd)とログインノードで実行されているユーザーコマンドが,事前に配布されたローカルファイルからではなくslurmctldから構成情報を参照できる機能です.すなわち,計算ノードやログインノードを設定ファイル(slurm.conf)をデプロイする必要がありません.
Configless Slurm機能を使用すればslurm.confをコピーする必要がないので,
管理がかなり楽になります.
Configless Slurmは,Slurm 20.02以降はデフォルトで組み込まれています.
Configlessモードを有効にするためには,slurm.confに下記のような記述を加えます.
...
SlurmctldParameters=enable_configless
Configless Slurmの導入は,次の手順で行えます.
- 時刻同期
- slurmdとslurm-clientのインストール
- MUNGEキーを登録
- 管理ノードのslurm.confを編集し,サービスの再起動
slurmd --conf-serverでSlurmを起動

計算ノード
- UIDとGIDの同期
- 管理ノードと時刻同期
- slurmdのインストール
- mumge.keyの設定
- slurmd.confの設定
UIDとGID
LDAP等でUIDとGIDを同期します.
NTPサーバの設定
apt install chrony
/etc/chrony/chrony.conf
...
allow 192.168.0.0/24
systemctl restart chrony
NTPクライアントの設定
apt install chrony
/etc/chrony/chrony.confを下記のように変更し,参照するNTPサーバを変更します.
- pool ntp.ubuntu.com        iburst maxsources 4
- pool 0.ubuntu.pool.ntp.org iburst maxsources 1
- pool 1.ubuntu.pool.ntp.org iburst maxsources 1
- pool 2.ubuntu.pool.ntp.org iburst maxsources 2
+ server 192.168.80.147 iburst
サービスを再起動します.
systemctl restart chronyd.service chrony.service
次のようなコマンドでNTPサーバを参照できればOKです.
chronyc sources
MS Name/IP address         Stratum Poll Reach LastRx Last sample
===============================================================================
^* 192.168.80.147                4   6    17     9    +32us[  +39us] +/- 6480us
Slurmクライアントの設定
apt install slurmd slurm-client
管理ノードのMUNGEキー(/etc/munge/munge.key)を計算ノードの/etc/munge/にコピーします.
MUNGEキーのコピー後,SlurmをConfiglessモードで起動します(slurmd --conf-server).
ジョブ投入
srun
ジョブを実行するコマンドです.オプションはコマンドライン引数で指定する方法です.
公式ドキュメントはこちら.
sbatchの方が使い勝手が良いため,あまり使用しません.
sbatch
さまざまなオプションを記述したスクリプトファイルを実行するコマンドです.
公式ドキュメントはこちら.
実行確認
下記に,sbatchジョブの例題を置いておきます.
job.sh
#!/bin/bash

#SBATCH --job-name=test_job
#SBATCH --ntasks=1
#SBATCH --output=stdout.%j
#SBATCH --error=stderr.%j
#SBATCH --partition=ALL
#SBATCH --time=10 # minite

echo "# Job Start : `date +"%Y%m%d-%T"`"

sleep 60

echo "#################################################"
echo ${SLURM_JOB_NAME}
echo ${SLURM_JOB_PARTITION}
echo ${SLURM_JOB_NUM_NODES}
echo ${SLURM_JOB_NODELIST}
echo "#################################################"

echo "# Normal termination : `date +"%Y%m%d-%T"`"
sbatchコマンドでジョブを投入します.
sbatch job.sh
いくつか投入すると下記のようにキューにジョブが溜まっていることが確認できます.
squeue
             JOBID PARTITION     NAME     USER ST       TIME  NODES NODELIST(REASON)
                82       ALL test_job  penguin PD       0:00      1 (Resources)
                83       ALL test_job  penguin PD       0:00      1 (Priority)
                84       ALL test_job  penguin PD       0:00      1 (Priority)
                74       ALL test_job  penguin  R       0:10      1 comput-01
                75       ALL test_job  penguin  R       0:10      1 comput-01
                76       ALL test_job  penguin  R       0:07      1 comput-01
                77       ALL test_job  penguin  R       0:07      1 comput-01
                78       ALL test_job  penguin  R       0:07      1 head
                79       ALL test_job  penguin  R       0:07      1 head
                80       ALL test_job  penguin  R       0:07      1 head
                81       ALL test_job  penguin  R       0:07      1 head

トラブルシューティング
設定するにあたっていくつかエラーに遭遇したので,その解決方法を以下の記事に記載しました.